Shipping is one of the first things that causes confusion when setting up a WooCommerce store. Everything else—products, payments, even design—tends to feel straightforward. But shipping quickly turns into questions like: Why are my rates not showing? Why are customers seeing the wrong price? Why can’t I limit shipping to certain countries?
In most sites I build, shipping issues are usually caused by one thing: shipping zones not being set up correctly. WooCommerce doesn’t just use a single global shipping setting. Instead, it relies on zones to control where you ship and how much you charge.
Once you understand how shipping zones work, the entire system becomes much easier to manage.
Quick Answer / Summary
WooCommerce shipping zones let you define where you ship (locations) and how you charge (shipping methods).
To set them up:
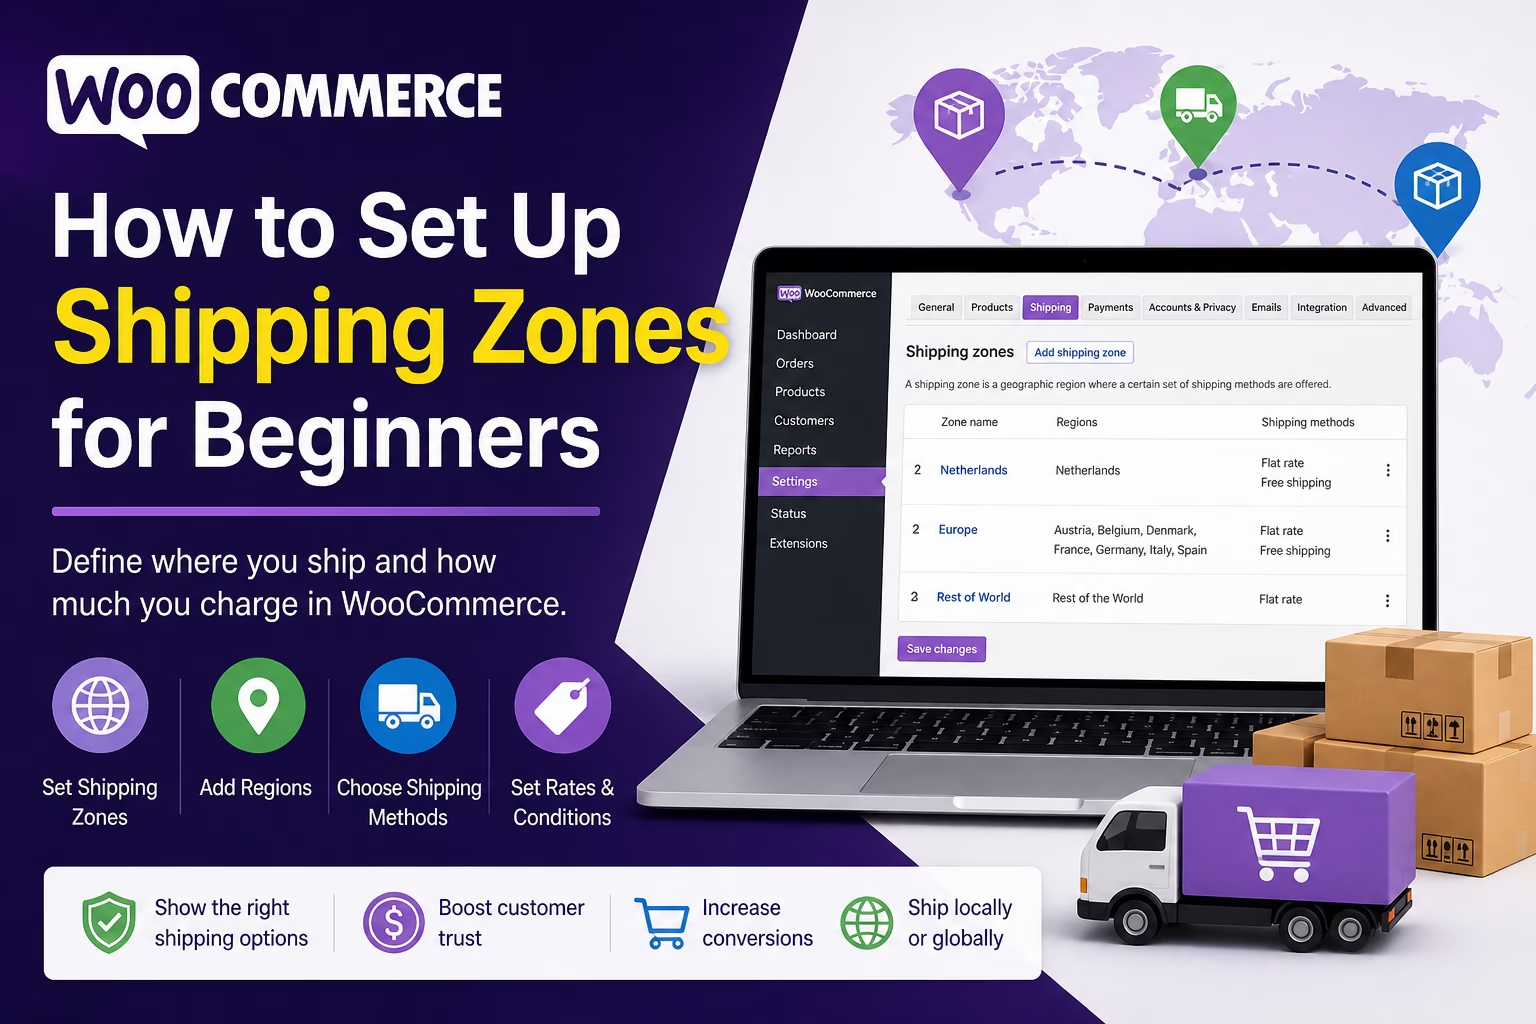
- Go to WooCommerce → Settings → Shipping
- Create a shipping zone (e.g., “Netherlands” or “Europe”)
- Add regions (countries, states, or postcodes)
- Add shipping methods (flat rate, free shipping, local pickup)
- Repeat for other regions
Customers will see the shipping method that matches their location.
Why This Matters
If shipping zones aren’t set up properly, a few common problems appear:
- Customers see no shipping options at checkout
- Shipping costs are incorrect or inconsistent
- You accidentally allow orders from countries you don’t ship to
- Free shipping appears when it shouldn’t
From an SEO and conversion perspective, this matters more than it seems. Confusing or incorrect shipping is one of the fastest ways to lose a sale. I’ve seen stores with good traffic fail simply because checkout shipping didn’t make sense.
Step-by-Step Instructions
Step 1: Open WooCommerce Shipping Settings
In your WordPress dashboard:
- Go to WooCommerce → Settings
- Click the Shipping tab
You’ll see a section called Shipping Zones. This is where everything starts. WooCommerce also explains its shipping zone settings in its official shipping zones documentation.
Step 2: Add Your First Shipping Zone
Click “Add shipping zone”
You’ll need to define:
- Zone name (for internal use only)
- Example: “Netherlands”, “EU”, or “Rest of World”
- Zone regions
- Select countries, states, or specific postcodes
Example setup:
- Zone name: Netherlands
- Region: Netherlands
In most setups I recommend starting simple—create one zone for your main market first before adding more.
Step 3: Add Shipping Methods
Once the zone is created, click “Add shipping method”
You’ll typically choose from:
- Flat rate – fixed cost (e.g., €5 shipping)
- Free shipping – conditional or always free
- Local pickup – customer collects the order
You can add multiple methods to the same zone.
Example:
- Flat rate: €5
- Free shipping: available for orders over €50
After adding a method, click Edit to configure it.
Step 4: Configure Shipping Method Settings
Each method has its own settings.
Flat Rate
- Set a fixed price (e.g., €5)
- You can also use formulas (advanced use)
Free Shipping
- Choose a condition:
- Minimum order amount
- Coupon requirement
- Both
Local Pickup
- Usually no cost
- Optional description for customers
In my experience, most beginner stores should keep this simple:
- Flat rate + optional free shipping threshold
Step 5: Create Additional Zones
Repeat the process for other regions.
Typical structure:
- Netherlands (main market)
- Europe
- Rest of World
WooCommerce checks zones top to bottom, so order matters.
- Place specific zones (like Netherlands) at the top
- Place broader zones (like Rest of World) at the bottom
Step 6: Test Your Shipping Setup
Before going live:
- Add a product to cart
- Enter different shipping addresses
- Confirm:
- Correct shipping method appears
- Prices are correct
- No missing options
When I set this up on WordPress sites, I always test at least 3–4 different locations. Most issues show up during testing, not configuration.
Practical Tips or Observations
Keep Zones Simple First
Many beginners try to create too many zones immediately. That usually creates confusion.
Start with:
- One main country
- One international zone
Expand later if needed.
Use Free Shipping Strategically
Free shipping can increase conversions, but only if it’s controlled.
A common setup:
- €5 flat rate
- Free shipping over €50
This encourages larger orders without hurting margins.
Combine Zones with Payment Strategy
Shipping and payments are connected. If you are still setting up the broader store configuration, you may also want to review this guide on WooCommerce payments, shipping, and taxes. For example:
- Some countries may require different payment methods
- High shipping costs may justify limiting certain regions
I usually recommend aligning shipping zones with where you can realistically deliver reliably.
Watch Zone Priority
WooCommerce uses the first matching zone.
If “Europe” is above “Netherlands”, Dutch customers might get the wrong rates.
This is one of the most common issues I see.
Common Mistakes
1. No Shipping Zone Matches Customer Location
If no zone matches, customers won’t see shipping options.
Fix:
- Always include a fallback zone like “Rest of World”
2. Overlapping Zones
Example:
- Zone 1: Europe
- Zone 2: Netherlands
If Europe is above Netherlands, it overrides it.
Fix:
- Put specific zones first
3. Forgetting to Add Shipping Methods
Creating a zone alone is not enough.
Fix:
- Always add at least one shipping method per zone
4. Not Testing Checkout
Everything may look correct in settings, but fail at checkout.
Fix:
- Always test with real addresses
5. Overcomplicating Pricing
Complex shipping formulas often cause confusion.
Fix:
- Start simple, then optimize later
When to Use This vs Alternatives
Use WooCommerce Shipping Zones When:
- You want simple regional shipping rules
- You use flat rates or free shipping
- You manage shipping manually
Consider Alternatives When:
- You need real-time carrier rates (e.g., UPS, DHL)
- You ship globally with complex logistics
- You need weight-based or dynamic pricing at scale
In those cases, plugins like carrier integrations or advanced shipping tools can help.
But for most beginner stores, built-in shipping zones are more than enough.
Conclusion
WooCommerce shipping zones control who you ship to and what they pay. Once set up correctly, they remove most of the confusion around checkout.
Start with a simple structure, test it properly, and only add complexity when your store actually needs it. That approach avoids most of the issues I see when reviewing new WooCommerce sites.

Etienne Basson works with website systems, SEO-driven site architecture, and technical implementation. He writes practical guides on building, structuring, and optimizing websites for long-term growth.