When someone sets up a new WordPress site, they usually get through the setup, install a theme, maybe configure a few plugins—and then hit a wall.
They know they need to start publishing content, but when they open WordPress, the editor feels unclear. Where do you actually write? Where do you add images? What do all those settings on the right side do? And what’s required before you hit publish?
I see this a lot. People understand what they should write (especially if they’ve already done keyword research), but they’re not confident about how to turn that into a proper post inside WordPress.
This guide walks through the exact process of creating and publishing a post, step by step, without mixing in SEO theory or content strategy.
Quick Answer / Summary
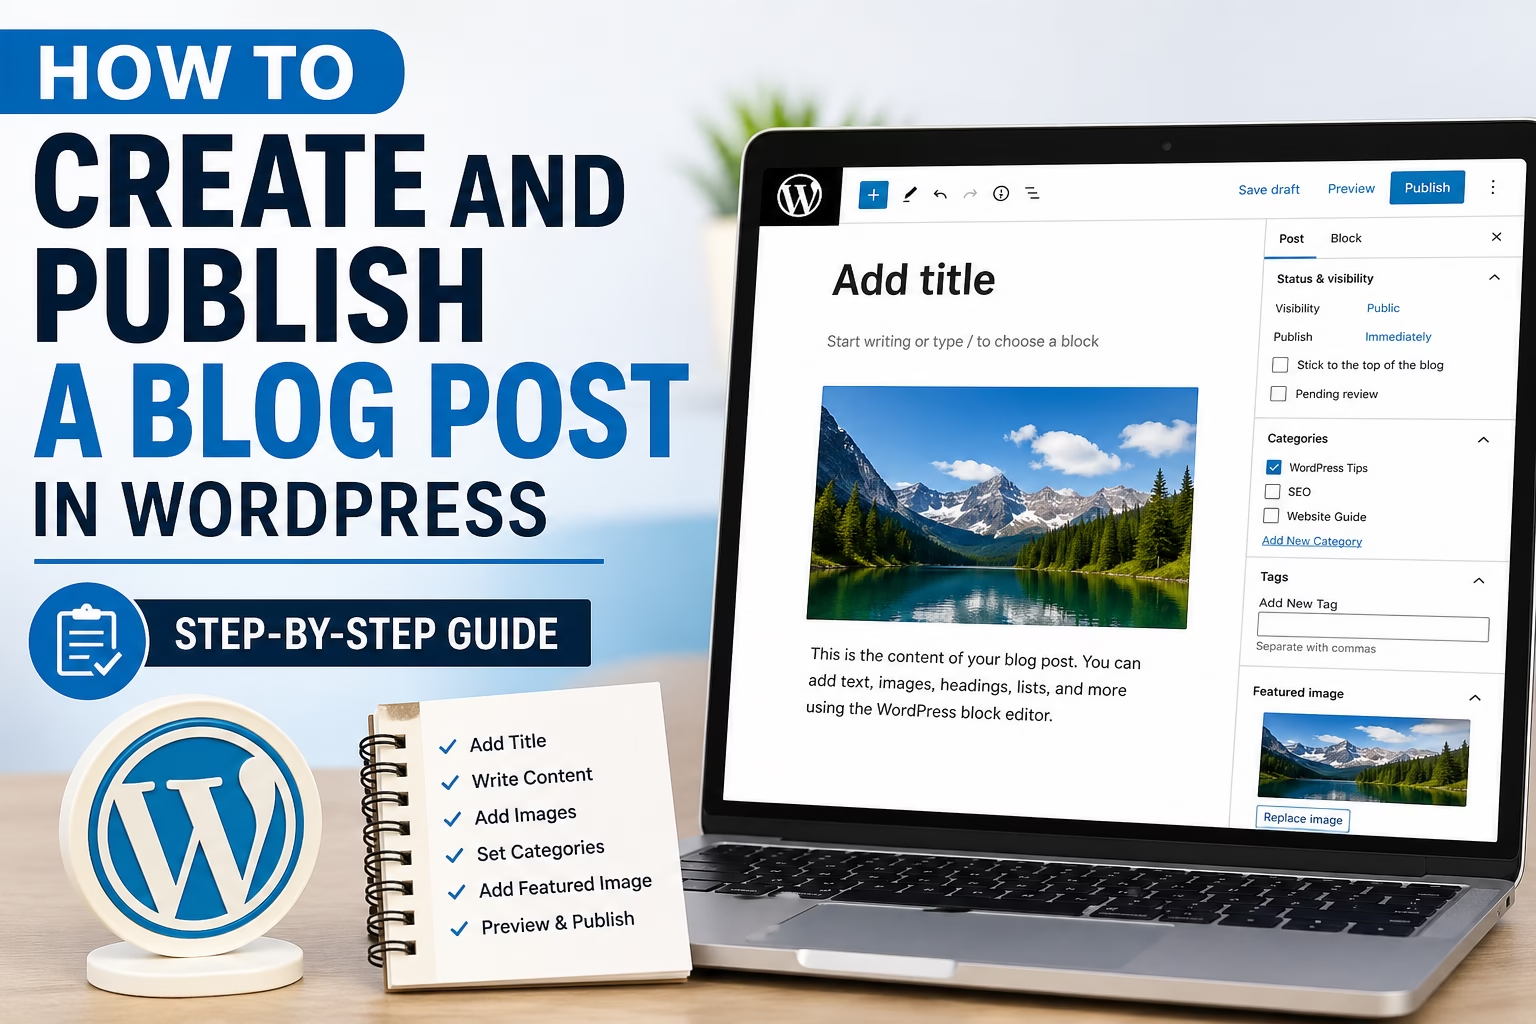
To create and publish a WordPress blog post:
- Go to Posts → Add New
- Add your title and content using the block editor
- Insert images and format the content
- Set your category and tags
- Add a featured image
- Preview the post
- Click Publish
That’s the basic workflow. The details below make sure it’s done properly.
Why This Matters
Publishing a post isn’t just about typing content and clicking publish.
If the post isn’t structured correctly, you’ll run into issues like:
- Poor readability
- Missing images or layout problems
- Disorganized categories
- Weak internal linking
- Inconsistent design across posts
In most sites I build, the difference between a basic post and a properly set up post is what makes the site feel complete and usable.
Step-by-Step Instructions
1. Open the WordPress Post Editor
From your dashboard:
- Go to Posts → Add New
This opens the WordPress block editor.
If you’ve already created drafts before, you can also go to:
- Posts → All Posts → Edit
2. Add Your Post Title
At the top of the editor, you’ll see:
“Add title”
Enter your post title here. This becomes:
- The main heading (H1)
- The default page title in most themes
Keep it clear and descriptive.
3. Add Your Content Using Blocks
Below the title, start writing your content.
WordPress uses a block system, which means:
- Each paragraph is its own block
- Headings are separate blocks
- Images, lists, and buttons are all blocks
To add a new block:
- Press Enter
- Or click the + icon
Common blocks you’ll use:
- Paragraph
- Heading
- Image
- List
If you’re still getting comfortable with the editor itself, start with the WordPress block editor guide. This is where that knowledge gets applied in practice.
4. Structure the Post Properly
As you write, break the content into sections using headings.
Typical structure:
- Introduction
- Main sections (with H2 headings)
- Supporting sections (H3 where needed)
Avoid writing one long block of text. Short paragraphs improve readability.
5. Add Images
To insert an image:
- Click the + icon
- Select Image
- Upload or choose from your media library
In most sites I build, I recommend:
- Adding at least one image near the top
- Using images to break up longer sections
After inserting:
- Add alt text (important for accessibility and SEO)
- Adjust alignment if needed
6. Set Categories and Tags
On the right sidebar:
- Find Categories
- Select the appropriate category
If none exist yet, you can create one.
Then:
- Add tags if you use them on your site
Keep this consistent across posts. It helps both users and site structure.
7. Add a Featured Image
Still in the right sidebar:
- Open Featured Image
- Upload or select an image
This image is used:
- In blog listings
- On social previews
- At the top of many themes
I usually recommend using a consistent style for featured images across the site.
8. Adjust Post Settings (Optional but Recommended)
Before publishing, check:
- Permalink (URL)
Make sure it’s clean and readable - Excerpt (if your theme uses it)
Add a short summary - Author (if multiple users)
Set correctly if needed
9. Preview the Post
Before publishing:
- Click Preview
Check (you can also use tools like PageSpeed Insights to review mobile layout and performance):
- Layout
- Spacing
- Mobile view (important)
This step catches most formatting issues.
10. Publish the Post
When everything looks correct:
- Click Publish
- Confirm by clicking Publish again
Your post is now live.
Practical Tips and Observations
In most WordPress setups, a few small habits make a big difference:
- Write in sections, not all at once
It’s easier to structure as you go - Preview early
Don’t wait until the end to check layout - Use consistent formatting
Same heading sizes, spacing, and image style across posts - Keep the sidebar visible
Many beginners miss important settings because it’s collapsed
When I set this up on WordPress sites, I also make sure categories are planned ahead of time so posts don’t end up scattered. As the site grows, having a structured editorial workflow in WordPress also helps keep publishing, SEO reviews, and content updates organized.
Common Mistakes
1. Publishing Without a Featured Image
This leads to:
- Empty blog listings
- Poor social sharing previews
2. Ignoring Categories
Posts end up uncategorized, which weakens site structure.
3. Writing in One Large Block
Makes the content hard to read and scan.
4. Not Previewing Before Publishing
This is where most formatting issues are missed.
5. Overusing Tags
Too many tags can clutter your site instead of helping organization.
When to Use This vs Alternatives
This process works for:
- Standard blog posts
- Informational content
- SEO articles
You might use a different approach when:
- Creating landing pages (use page builder or page templates)
- Building sales pages (more design-focused)
- Creating custom layouts (using advanced tools or themes)
In those cases, posts are not always the right format.
Conclusion
Creating and publishing a WordPress post is straightforward once you understand the workflow.
The key steps are:
- Add content using blocks
- Structure it clearly
- Set categories and images
- Preview before publishing
Once this process becomes routine, publishing content becomes much faster and more consistent across your site.

Etienne Basson works with website systems, SEO-driven site architecture, and technical implementation. He writes practical guides on building, structuring, and optimizing websites for long-term growth.