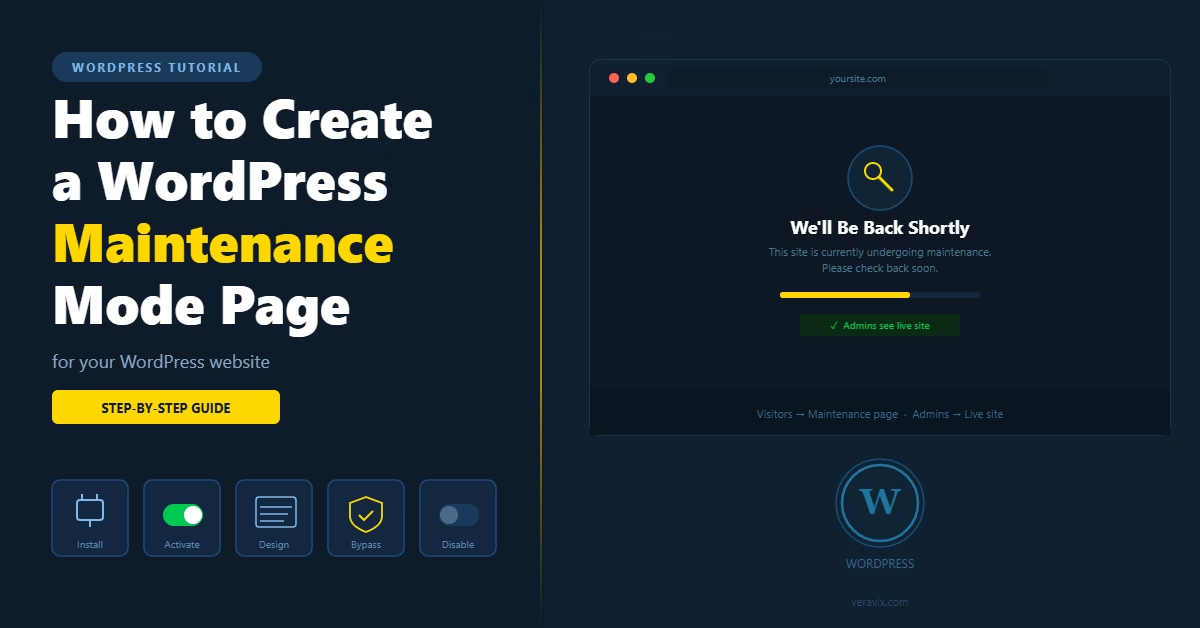
Quick Answer
To put WordPress into maintenance mode, install a maintenance mode plugin, activate the mode, and configure a basic holding page with a short message. Administrators continue to see the live site. Visitors see the maintenance page until you switch the mode off. The most reliable free option is LightStart (formerly WP Maintenance Mode) by Themeisle — 500,000+ active installs, regularly updated, and straightforward to configure.Why Maintenance Mode Matters
Without maintenance mode, any changes you make to a live WordPress site are potentially visible to visitors the moment they happen. This creates several problems. If you are switching themes, a visitor might land on the site between the moment the old theme is deactivated and the new one is fully configured. They see a broken or unstyled page. If you are updating plugins, there is a brief window where database changes may not yet match the plugin code. A visitor hitting that window could see a PHP error or broken functionality. If you are redesigning a page or updating core content, partially edited text and images could appear publicly before the work is finished. Maintenance mode closes all of this off with a single toggle.Step 1: Install LightStart
- In your WordPress dashboard, go to Plugins → Add New Plugin.
- Search for LightStart.
- Click Install Now, then Activate.
Step 2: Activate Maintenance Mode
- After activating the plugin, go to Settings → LightStart in your dashboard.
- On the General tab, find the Status setting.
- Set it to Activated.
- Click Save Settings.
Step 3: Set Up the Holding Page
The default maintenance page is plain but functional. In most cases, customising it takes a few minutes and makes a significant difference.- Go to the Design tab in LightStart settings.
- Update the Title to something clear — for example, “We’ll be back shortly” or “Site maintenance in progress”.
- Add a short description explaining what is happening and when the site will return, if you know.
- Optionally upload a background image or change the background colour to match your brand.
- Save settings.
Step 4: Configure Administrator Bypass
By default, logged-in administrators see the live site rather than the maintenance page. This is correct behaviour — it allows you to continue working on the front end while maintenance mode is active. If you want to check that the maintenance page is displaying correctly while logged in, use an incognito window or a second browser where you are not logged in. If you need another user — a developer or designer, for example — to access the site during maintenance, they need to be assigned an appropriate WordPress user role with dashboard access. They can then log in and work without seeing the maintenance screen.Step 5: Deactivate Maintenance Mode
When your work is complete and the site is ready:- Return to Settings → LightStart.
- Set Status to Deactivated.
- Save settings.
Practical Tips
Disable caching while maintenance mode is active. Caching plugins can occasionally serve a cached version of a normal page instead of the maintenance page, meaning some visitors bypass it entirely. LiteSpeed Cache should be paused or cleared when maintenance mode is switched on. Use the Exclude URLs setting carefully. LightStart allows you to whitelist specific URLs so they remain accessible during maintenance. This is useful if your site has a booking form, payment page, or login URL that needs to stay live. Find this option under the General tab. Avoid leaving maintenance mode on longer than necessary. Google will begin to see the maintenance page rather than your normal content if the mode stays active for extended periods. For planned downtime lasting more than a few hours, consider scheduling work overnight or outside peak traffic times. Test on mobile. The default LightStart templates are responsive, but it is worth checking the maintenance page on a mobile device before starting work, just to confirm it renders cleanly. In most sites I work on, I configure the maintenance page template once when the plugin is first installed and then simply toggle the mode on and off as needed.Common Mistakes
Forgetting to turn it off. This sounds obvious, but it happens often — especially when site work takes longer than expected. Maintenance mode left on overnight can affect crawling and indexing if search engines visit during that period. Not clearing the cache after deactivating. If your caching plugin continues serving the old maintenance page to visitors, your site will appear still broken even after everything is fixed. Relying on WordPress’s built-in.maintenance file. WordPress creates a temporary .maintenance file automatically during core updates, but this is not a reliable or configurable maintenance mode. It disappears on its own after a few minutes and cannot be customised. Use a plugin for any planned maintenance work.
When to Use a Different Approach
For very brief updates — swapping an image, fixing a typo, updating a widget — maintenance mode is often unnecessary. These changes are fast enough that the risk of a visitor seeing a broken state is minimal. For a full redesign or migration to a new hosting provider, maintenance mode may not be sufficient on its own. In those cases, a staging environment is a better approach. You build and test the new version on a separate site, then push the changes live in a single step. Maintenance mode is the right tool for anything in between: plugin updates, theme configuration changes, content restructuring, or any task that requires the site to be in an intermediate state for more than a few minutes. For the full plugin details, refer to the LightStart plugin page on WordPress.org.Final Thoughts
Maintenance mode is a small habit that avoids unnecessary problems. Install the plugin, configure the holding page once, and toggle it on whenever you are making changes that affect the front end. The whole setup takes under five minutes and saves visitors from seeing work in progress. If you want to make sure your site handles downtime well in general, setting up WordPress uptime monitoring is a useful next step — it keeps you informed the moment the site goes down, whether planned or not.
Etienne Basson works with website systems, SEO-driven site architecture, and technical implementation. He writes practical guides on building, structuring, and optimizing websites for long-term growth.