WordPress does not convert images to WebP automatically. When you upload a JPEG or PNG to your media library, WordPress stores it as-is and serves it as-is — no format conversion happens unless you add a plugin to handle it.
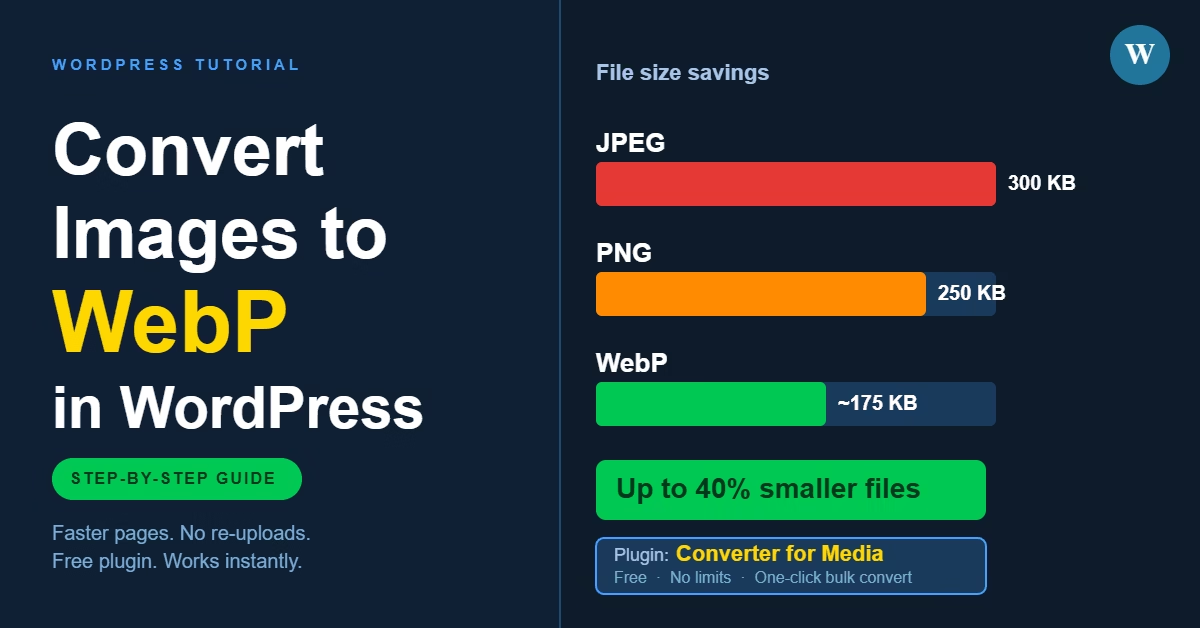
This matters because WebP images are significantly smaller than their JPEG or PNG equivalents, often by 25–35%, without any visible difference in quality. Smaller images mean faster page loads, lower bandwidth usage, and better scores in Google PageSpeed Insights. For most WordPress sites, switching to WebP is one of the quickest performance wins available.
The good news is that the process is straightforward. One plugin handles everything — bulk conversion of your existing library, automatic conversion on new uploads, and serving the right format to each browser.
What WebP Actually Does
WebP is a modern image format developed by Google. It uses advanced compression to produce smaller file sizes than JPEG or PNG while preserving visual quality. Over 95% of browsers now support WebP, including Chrome, Firefox, Safari, and Edge. For older browsers that do not support it, well-configured plugins serve the original image as a fallback automatically.
In practical terms, a product photo that sits at 300 KB as a JPEG will often come in at 180–220 KB as a WebP, with no perceptible quality difference. Multiply that across every image on your site and the performance impact adds up quickly.
The Plugin to Use: Converter for Media
The plugin I recommend for most WordPress sites is Converter for Media. It is free, well-maintained, and handles everything without requiring a third-party account or API key. Conversion runs on your server using the GD or Imagick library that your host already provides.
Key things it does:
- Converts all images in your existing media library in bulk with a single click
- Automatically converts new images on upload going forward
- Keeps your original files untouched and uses server-side redirection to serve WebP to supported browsers
- Falls back to the original format for browsers that do not support WebP
- Lets you restore the original serving behaviour instantly if needed
The original files stay in place. The plugin creates separate WebP versions and redirects requests to them transparently. Your image URLs do not change.
How to Install and Configure It
Step 1: Install the plugin
In your WordPress dashboard, go to Plugins → Add New. Search for Converter for Media. Install and activate it.
Step 2: Review the settings
Go to Settings → Converter for Media. The default configuration works for most sites. The key settings to check:
- Conversion method — leave this as GD or Imagick (whichever your server supports). If you see an error here, contact your host to confirm which library is available.
- Convert images uploaded in the future — make sure this is enabled so new uploads are handled automatically.
- WebP quality — the default of 80 is a good balance. You can lower it slightly (to 75) if you need smaller files, or raise it if you notice visible quality loss on specific images.
Step 3: Run the bulk conversion
On the same settings page, you will see a Bulk Optimization section showing how many images in your library have not yet been converted. Click Start bulk optimization. The plugin works through your library in batches. On a site with hundreds of images this can take a few minutes — leave the page open until it completes.
Step 4: Confirm it is working
Once conversion is done, open a post or page on your site in Chrome. Right-click an image and select Open image in new tab. Check the URL — if the extension shows as .webp, conversion is working. Alternatively, open Chrome DevTools, go to the Network tab, filter by Img, and reload the page. The Type column will show webp for converted images.
Practical Tips
Check server compatibility first. The plugin requires either the GD library with WebP support or the Imagick library. Most shared hosts support this by default, but it is worth checking the plugin’s settings page before running the bulk conversion — it will flag any compatibility issues clearly.
Images already on your site need the bulk conversion run. The automatic conversion only applies to images uploaded after activation. Any images already in your media library stay as JPEG or PNG until you run the bulk optimizer manually.
Pair this with image SEO best practices. WebP conversion reduces file size but does not affect your filenames or alt text. For guidance on naming files correctly and setting alt attributes, see How to Optimize Images for SEO in WordPress.
LiteSpeed Cache users. If you are running LiteSpeed Cache (which Veravix uses), it has its own image optimisation feature under LiteSpeed Cache → Image Optimization. You can use either Converter for Media or LiteSpeed’s built-in optimiser — there is no need to run both. LiteSpeed’s tool also handles WebP conversion and is worth checking if you are already in that plugin’s settings.
Common Mistakes
Skipping the bulk conversion. Activating the plugin and not running the bulk optimizer means only new uploads are served as WebP. Your existing library — which is usually the majority of your images — stays unconverted until you run it.
Expecting the image URLs to change. They do not. Converter for Media uses server-side redirection (.htaccess rules on Apache or Nginx configuration) to silently serve the WebP version when a browser requests the original URL. The URL in your content stays the same, which means nothing in your posts or pages needs to be updated.
Deactivating the plugin without reverting. If you deactivate Converter for Media without first restoring the original files, the redirect rules it added may cause images to return 404 errors on some server configurations. The plugin has a revert option — use it before deactivating if you decide to switch to a different solution.
When to Use a Different Approach
Converter for Media is the right choice for most sites. The main exception is if you are already using an image optimisation plugin that includes WebP conversion — Imagify and ShortPixel both do this, for example. Running two WebP conversion plugins on the same site is unnecessary. Check what you already have installed before adding another tool.
If your site is on WooCommerce with a large product catalogue and you need AVIF support in addition to WebP, the Pro version of Converter for Media adds AVIF conversion and offloads processing to external servers, which reduces the load on shared hosting during bulk conversion.
Conclusion
Install Converter for Media, run the bulk optimizer once, and enable automatic conversion for future uploads. That covers your existing library and everything going forward, with no changes required to your content or image URLs.

Etienne Basson works with website systems, SEO-driven site architecture, and technical implementation. He writes practical guides on building, structuring, and optimizing websites for long-term growth.