When a WooCommerce store starts growing, navigation becomes one of the biggest problems. A small shop with five products is easy to browse, but once you start adding categories, variations, colors, sizes, brands, or price ranges, visitors can struggle to find what they actually want.
This is where product filters become important. Filters help shoppers narrow down products quickly without manually browsing page after page. In most WooCommerce stores I build, filters become necessary much earlier than people expect. Even stores with only 20–30 products can benefit from better filtering and navigation.
Good product filters also improve usability on mobile devices, reduce frustration, and can increase conversions because visitors reach relevant products faster.
Quick Answer
You can add product filters to WooCommerce using WooCommerce blocks, your theme’s built-in filtering options, or a dedicated filtering plugin. Most stores use filters for categories, price ranges, product attributes, stock status, ratings, or tags.
For beginners, the easiest setup is usually WooCommerce’s built-in Product Filter blocks or a lightweight plugin that supports AJAX filtering.
Why Product Filters Matter
Without filters, visitors often rely entirely on search or category pages. That works for very small stores, but larger product catalogs become difficult to browse.
Product filters help customers:
- Find products faster
- Narrow results by size, color, brand, or price
- Compare similar items
- Browse large catalogs more easily
- Improve mobile shopping usability
Filters can also help SEO indirectly because visitors spend more time browsing relevant products instead of leaving immediately.
In my experience, stores with organized filtering usually feel more professional and easier to trust.
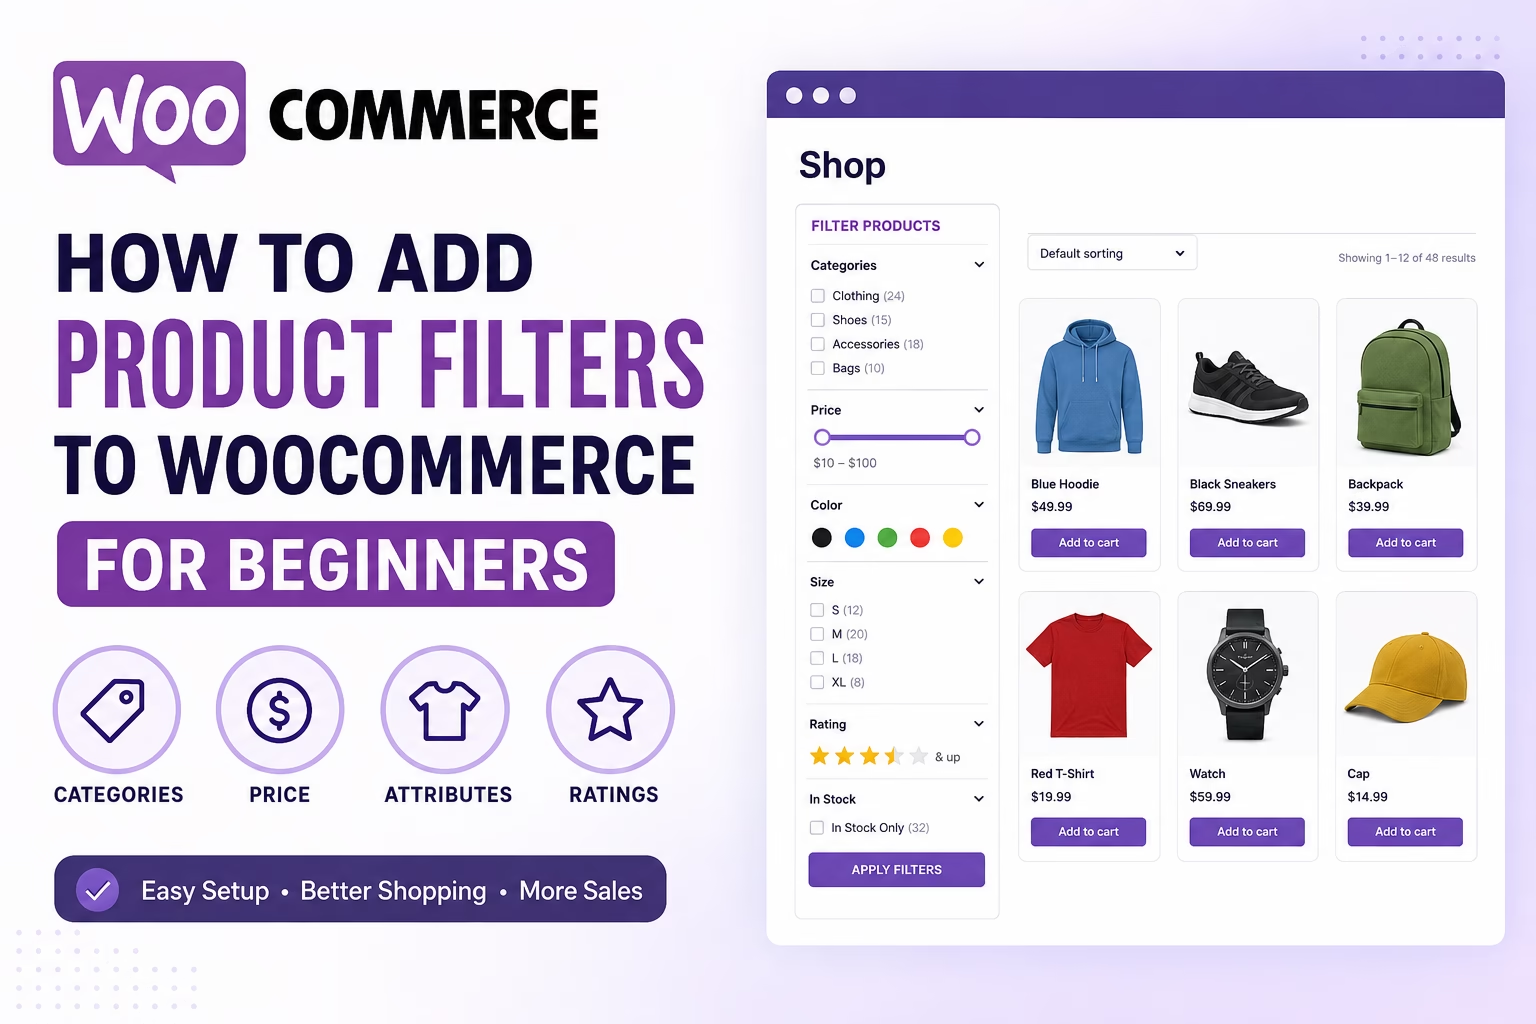
Types of WooCommerce Product Filters
Before setting anything up, it helps to understand the most common filter types.
Category Filters
These allow visitors to browse product categories like:
- Clothing
- Electronics
- Accessories
- Home Decor
WooCommerce already supports categories by default.
Attribute Filters
Attributes are things like:
- Size
- Color
- Material
- Brand
- Style
These are the most useful filters for most ecommerce stores.
Price Filters
Price sliders or price ranges help shoppers stay within budget.
Examples:
- Under $25
- $25–$50
- $50–$100
Rating Filters
These let customers show only highly rated products.
Stock Availability Filters
Useful for hiding out-of-stock products or showing only available items.
Step 1: Create Product Attributes in WooCommerce
Before filters can work properly, your products need organized attributes.
In WordPress:
- Go to Products → Attributes
- Create attributes like:
- Color
- Size
- Brand
- Click Configure Terms
- Add the values for each attribute
For example:
- Color:
- Black
- White
- Blue
- Size:
- Small
- Medium
- Large
Once created, assign these attributes to products.
A common mistake is creating inconsistent attribute names. For example, some products might use “Blue” while others use “Dark Blue.” Consistency matters because filters rely on clean taxonomy structures.
Step 2: Assign Attributes to Products
Next:
- Open a product
- Scroll to Product Data
- Select the Attributes tab
- Add the relevant attributes
- Save the product
If you use variable products, these attributes can also power product variations.
For example:
- Shirt Size
- Shirt Color
In most WooCommerce stores, I usually recommend planning attributes carefully before adding hundreds of products. Reorganizing filters later becomes time-consuming.
Step 3: Add WooCommerce Product Filter Blocks
Modern WooCommerce installations include filter blocks that work well for beginners.
Go to:
Appearance → Editor
or
Pages → Shop Page
Add blocks such as:
- Filter Products by Attribute
- Filter Products by Price
- Filter Products by Stock
- Filter Products by Rating
These blocks are usually placed in:
- A sidebar
- A filter panel
- Above product grids
For block themes, this process is straightforward. Classic themes may use widget areas instead. If you are still setting up the shop layout itself, it helps to first review how to customize your WooCommerce shop page so the filter area fits naturally with the product grid.
Step 4: Add Filters Using Widgets (Classic Themes)
If your theme uses classic widgets:
- Go to Appearance → Widgets
- Open the Shop Sidebar
- Add WooCommerce filter widgets
Common widgets include:
- Filter Products by Price
- Filter Products by Attribute
- Product Categories
- Active Product Filters
This setup still works well on many WooCommerce themes.
Step 5: Improve Filters with a Plugin
WooCommerce’s built-in filters are enough for many small stores, but larger shops often need more advanced filtering. WooCommerce also provides official documentation for its product filtering and search tools if you want to explore more advanced setups.
Features people commonly want include:
- AJAX filtering without page reloads
- Multi-select filters
- Better mobile filter panels
- Brand filters
- Search inside filters
- Filter styling options
Popular filtering plugins include:
- YITH WooCommerce Ajax Product Filter
- Filter Everything
- WOOF Product Filter
- JetSmartFilters
I usually recommend avoiding overly complex filtering plugins unless the store genuinely needs advanced functionality. Heavy filter plugins can slow down large WooCommerce stores if they are poorly configured.
Step 6: Test Filters on Mobile Devices
A filter system that works on desktop may feel frustrating on mobile.
After setup, test:
- Filter visibility
- Sidebar usability
- Touch interaction
- Filter reset buttons
- Loading speed
Mobile filter panels should stay simple and easy to close.
In many stores I review, mobile filters become cluttered because too many filtering options are displayed at once.
Practical Tips for Better WooCommerce Filters
Keep Filters Relevant
Only add filters customers actually use.
For example:
Good:
- Brand
- Size
- Price
Not useful:
- SKU
- Internal product codes
Avoid Too Many Filter Choices
Large filter lists overwhelm visitors.
If you sell clothing, showing 40 color options may create unnecessary friction.
Use Clear Naming
Use terms customers naturally understand.
Examples:
- “Price”
- “Brand”
- “Size”
Avoid technical wording.
Plan Attributes Before Importing Products
This becomes especially important for stores importing products from CSV files or third-party systems.
Cleaning inconsistent attributes later can become a major project.
Combine Filters with Good Categories
Filters should support categories, not replace them.
A clean structure usually looks like:
Category → Subcategory → Filters
Common WooCommerce Filter Mistakes
Using Categories Instead of Attributes
Some store owners create dozens of categories when attributes would work better.
Example:
Bad categories:
- Red Shirts
- Blue Shirts
- Green Shirts
Better approach:
- Category: Shirts
- Attribute: Color
Installing Too Many Filtering Plugins
Multiple filtering plugins often conflict with each other.
Choose one reliable system and keep it simple.
Ignoring Site Speed
Some advanced AJAX filters create heavy database queries.
Large WooCommerce stores should test performance carefully after enabling filtering.
Not Testing Empty Results
Some filter combinations may show no products.
Make sure your store handles this gracefully.
Poor Mobile Experience
Tiny filter buttons and crowded sidebars create usability problems quickly.
When to Use Advanced Filtering Plugins
Built-in WooCommerce filters work well for:
- Small stores
- Beginner websites
- Basic product catalogs
- Simple attribute filtering
Advanced plugins are better for:
- Large ecommerce stores
- Fashion stores
- Electronics stores
- Wholesale catalogs
- Multi-brand shops
If your store has hundreds or thousands of products, advanced filtering usually becomes worth the extra setup.
Conclusion
WooCommerce product filters make it easier for visitors to browse products, especially as your catalog grows. Even a basic setup using categories, attributes, and price filters can improve usability significantly.
For most beginners, the best approach is to start with WooCommerce’s built-in filtering tools, organize attributes properly, and keep filters simple. As the store grows, you can expand into more advanced filtering systems if needed.
The most important part is consistency. Clean categories, organized attributes, and practical filter choices make WooCommerce stores easier to use and easier to manage long term.

Etienne Basson works with website systems, SEO-driven site architecture, and technical implementation. He writes practical guides on building, structuring, and optimizing websites for long-term growth.