A lot of new website owners focus heavily on getting traffic but forget to build a system that actually captures visitors before they leave. Someone reads a blog post, browses a few pages, and then disappears without subscribing, contacting you, or returning later.
That is where a lead capture funnel becomes useful.
In most WordPress sites I build, the funnel itself is usually simple. The difficult part is connecting the pieces properly so visitors move naturally from reading content to joining an email list or requesting a service. You do not need expensive software or complicated automation to make this work. A basic WordPress setup can handle it well if the structure is planned correctly.
Quick Answer
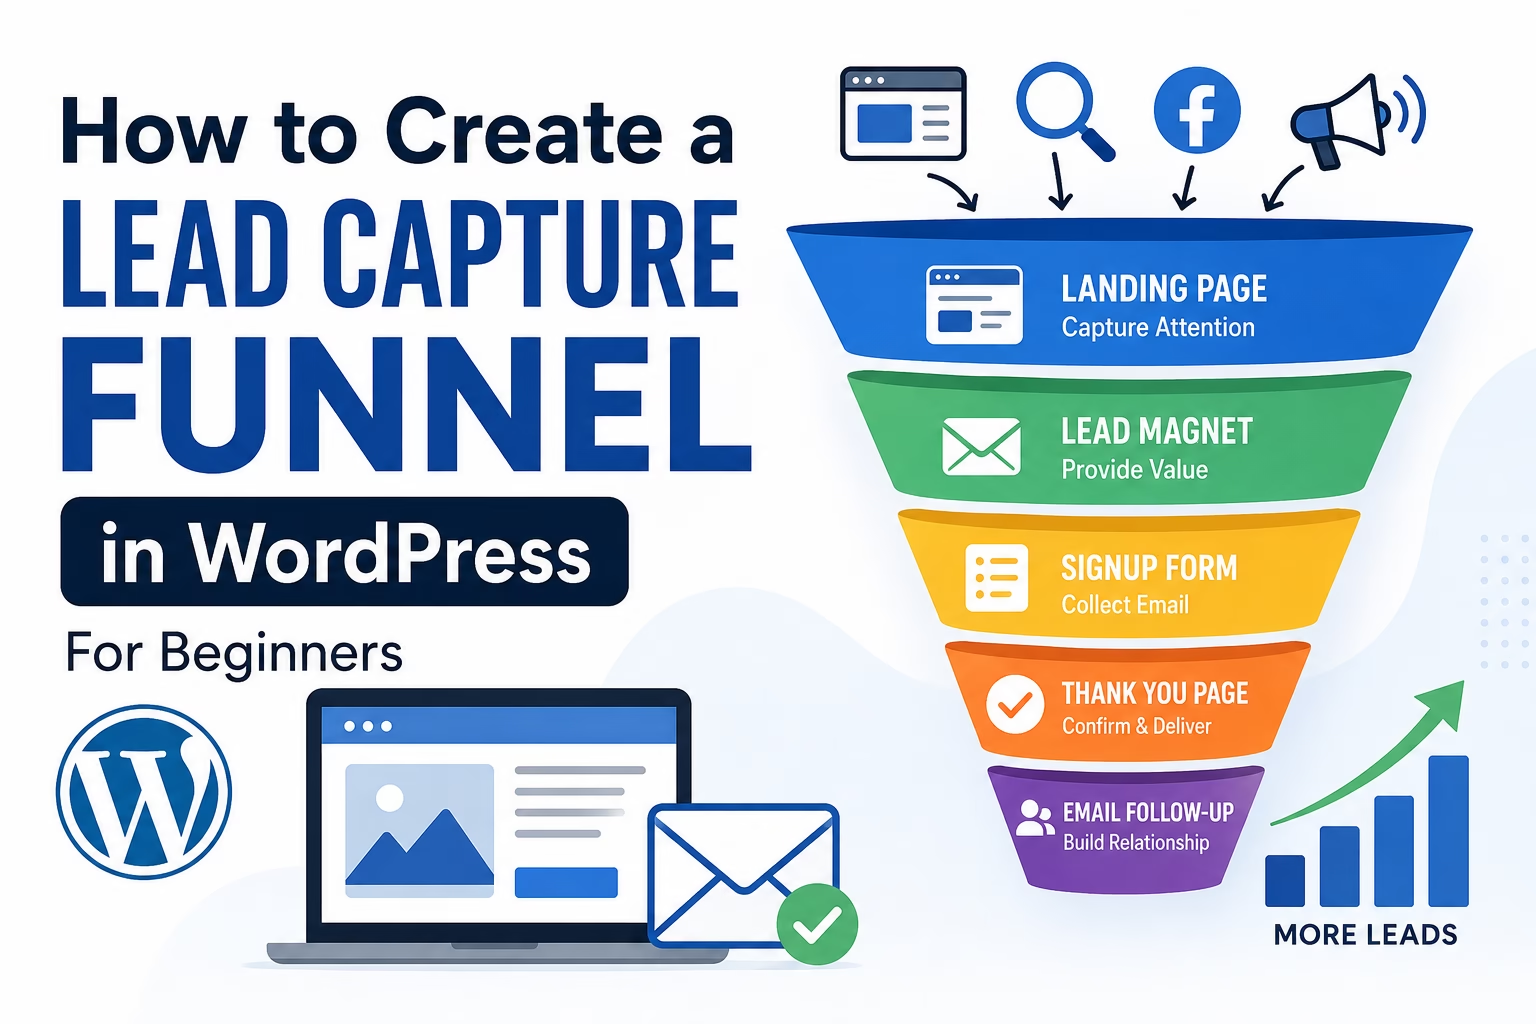
A WordPress lead capture funnel usually includes:
- A traffic source (blog post, search engine, social media, ads)
- A landing page or opt-in form
- A lead magnet or offer
- An email signup form
- A thank you page
- An automated follow-up email sequence
- Conversion tracking
The goal is to guide visitors toward one specific action instead of sending them through a general website navigation path.
Why a Lead Capture Funnel Matters
Without a funnel, most visitors leave your site without taking action. Even if your content ranks well in Google, traffic alone does not help much unless you can build an audience or generate leads from it.
A lead funnel helps you:
- Build an email list
- Generate service inquiries
- Promote products or digital downloads
- Follow up with visitors later
- Measure conversions more accurately
This is especially important for new websites because traffic growth usually takes time. Capturing even a small percentage of visitors early can make a noticeable difference later.
Step 1: Decide What You Want Visitors to Do
Before building pages or forms, decide on the single action you want visitors to take.
Common examples include:
- Download a checklist
- Join a newsletter
- Request a quote
- Book a consultation
- Download a free guide
- Access a template or resource
One of the biggest mistakes I see is trying to offer too many actions at once. A lead funnel works best when the visitor has one clear next step.
For example:
- A local business may want quote requests
- A blogger may want newsletter subscribers
- An online store may want coupon signups
- A consultant may want consultation bookings
Step 2: Create a Lead Magnet
A lead magnet is the thing visitors receive in exchange for their email address.
Good beginner-friendly lead magnets include:
- Checklists
- PDF guides
- Templates
- Resource lists
- Short tutorials
- Discount codes
- Email mini-courses
The lead magnet should solve a small but specific problem quickly.
For example, if your website teaches WordPress basics, a useful lead magnet could be:
- “10 Essential WordPress Settings Checklist”
- “Website Launch Checklist PDF”
- “Beginner SEO Setup Checklist”
Simple lead magnets often perform better than large complicated ebooks because visitors can use them immediately. Another effective approach is using an interactive assessment instead of a downloadable resource. For example, a website readiness quiz or marketing assessment can help visitors identify their next step while also encouraging email signups. Learn more about how to add a quiz or assessment to WordPress for lead generation.
Step 3: Create a Landing Page in WordPress
Your landing page should focus entirely on the offer. If you need the full setup process, follow this guide on how to create a landing page in WordPress.
Unlike a normal homepage, a funnel landing page removes distractions and keeps attention on the signup action.
Your page should include:
- A clear headline
- Short explanation of the offer
- Benefits of downloading or signing up
- An email signup form
- A call-to-action button
In my experience, shorter landing pages usually work better for beginner websites unless the product or service needs detailed explanation.
You can create landing pages using:
- The WordPress Block Editor
- SeedProd
- Elementor
- Kadence Blocks
- Spectra
If you already use the Block Editor, that is usually enough for a simple funnel.
Step 4: Add an Email Signup Form
Next, connect an email form to an email marketing service.
Popular beginner-friendly options include:
- MailerLite
- ConvertKit
- Mailchimp
- Brevo
Most services provide a WordPress plugin or embedded form code.
The signup form should ask for as little information as possible. Usually, a first name and email address are enough.
Too many fields often reduce conversions.
Place forms in:
- Landing pages
- Sidebar areas
- Blog posts
- Popups
- Footer sections
- Inline content areas
I usually recommend testing inline forms inside blog posts because they often feel less intrusive than aggressive popups. However, if you want to capture visitors before they leave the page, you can also add an exit-intent popup in WordPress for lead magnets, newsletter signups, and discount offers.
Step 5: Create a Thank You Page
After signup, send visitors to a dedicated thank you page.
Many websites skip this step, but it helps more than people expect. Here is a complete guide on how to create a thank you page in WordPress.
A thank you page can do more than confirm the signup. It can also introduce a small paid offer as the next step, which is why I usually recommend reading this guide on how to create a tripwire offer in WordPress after setting up the thank you page.
A thank you page can:
- Confirm the signup worked
- Explain the next step
- Deliver the lead magnet
- Recommend another article
- Encourage social follows
- Offer a related service
This page also helps with conversion tracking because you can track visits to the thank you page as completed signups.
For example:
yourwebsite.com/thank-you/
Step 6: Set Up Automated Emails
Once someone joins your list, they should automatically receive a welcome email.
At minimum, create:
- A confirmation or delivery email
- A welcome email
- One or two follow-up emails
The first email should deliver the promised resource immediately.
The next emails can:
- Recommend useful blog posts
- Introduce your services
- Share practical tips
- Encourage replies
- Build trust gradually
In most sites I manage, short practical emails perform better than long promotional sequences.
Step 7: Add Conversion Tracking
Tracking helps you understand whether the funnel is working.
At minimum, track:
- Landing page visits
- Form submissions
- Thank you page visits
- Email signup conversions
You can do this using:
- Google Analytics
- Google Tag Manager
- Google Site Kit
- Conversion events inside your email platform
If you already installed Google Analytics and Search Console, adding conversion tracking is usually straightforward.
Practical Tips for Better Funnel Performance
Keep the Funnel Simple
Complex funnels usually hurt beginner websites.
A simple structure works well:
Blog Post → Landing Page → Signup → Thank You Page → Email Sequence
Match the Offer to the Content
The lead magnet should match the topic visitors were already reading.
For example:
- SEO article → SEO checklist
- WooCommerce tutorial → Store setup guide
- Speed optimization post → Performance checklist
This improves signup rates because the offer feels relevant.
Use Clear Calls to Action
Avoid vague button text like:
- Submit
- Learn More
Instead use clearer wording like:
- Download the Checklist
- Get the Free Guide
- Send Me the Template
Test Mobile Layouts
A large percentage of visitors will see your funnel on mobile devices.
Always test:
- Form spacing
- Button sizes
- Popups
- Image scaling
- Loading speed
Common Lead Funnel Mistakes
Sending Traffic to the Homepage
A homepage usually contains too many navigation choices.
Landing pages convert better because they focus on one action.
Offering Weak Lead Magnets
Visitors rarely exchange their email address for generic information.
The offer should solve a specific problem quickly.
Asking for Too Much Information
Long forms reduce conversions.
Keep forms short unless you truly need extra details.
Ignoring Follow-Up Emails
Collecting emails without follow-up wastes the opportunity.
Even a simple 3-email sequence is better than no follow-up at all. As your funnel grows, it also helps to organize subscribers and enquiries properly using a simple CRM system in WordPress so leads do not get lost between forms, emails, and follow-ups. You should also learn how to segment email subscribers in WordPress so different subscriber groups receive more relevant follow-up emails and offers.
Not Tracking Results
Without tracking, you cannot improve the funnel properly.
Sometimes a small change to a headline or button can significantly improve conversions.
When to Use This Instead of Other Approaches
A lead capture funnel works best when you want to build an audience or generate leads over time.
However, other approaches may work better in some situations.
For example:
- An ecommerce store may focus more on direct product sales
- A portfolio website may prioritize contact forms
- A local business may rely more heavily on booking systems
- A news website may focus primarily on newsletter subscriptions
You also do not need complicated sales funnel software for most beginner WordPress websites. A simple WordPress setup combined with an email marketing service is usually enough.
Conclusion
A good WordPress lead capture funnel does not need to be complicated. The main goal is to guide visitors toward one clear action while removing distractions.
For most beginner websites, the best setup includes:
- A focused landing page
- A useful lead magnet
- A simple signup form
- A thank you page
- Basic automated emails
- Conversion tracking
Once the funnel is running, you can gradually improve headlines, forms, offers, and follow-up emails based on real visitor behavior.

Etienne Basson works with website systems, SEO-driven site architecture, and technical implementation. He writes practical guides on building, structuring, and optimizing websites for long-term growth.